SAP C_S4CPB Exam - C_S4CPB Zertifizierungsprüfung
Wiki Article
Das Ziel der SAP C_S4CPB Prüfungssoftware ist: Bei Ihrer Vorbereitung der SAP C_S4CPB Prüfung Ihnen die effektivste Hilfe zu bieten, um Ihre Geld nicht zu verschwenden und Ihre Zeit zu sparen. Unsere Software hat schon zahlose Prüfungsteilnehmer geholfen, SAP C_S4CPB Prüfung zu bestehen. Wenngleich die Bestehensquote sehr hoch ist, versprechen wir, dass wir alle Ihrer Gebühren für die SAP C_S4CPB Software erstatten wollen, falls Sie die Prüfung nicht bestehen. Wir tun so, um Sie beim Kauf unbesorgt zu machen.
Vielleicht mit zahlreichen Übungen fehlt Ihnen noch die Sicherheit für SAP C_S4CPB Prüfung. Falls Sie nach dem Kauf unserer Prüfungsunterlagen leider nicht SAP C_S4CPB bestehen, bieten wir Ihnen eine volle Rückerstattung. Aber wir glauben, dass unsere Prüfungssoftware, die unseren Kunden eine Bestehensrate von fast 100% angeboten hat, wird Ihre Erwartungen nicht enttäuschen!
Die neuesten C_S4CPB echte Prüfungsfragen, SAP C_S4CPB originale fragen
Es gibt eine Menge von Websites, die SAP C_S4CPB Zertifizierungsprüfung und andere Schulungsunterlagen bieten. Aber Fast2test ist die einzige Website, die Ihnen qualitativ hochwrtige Schulungsunterlagen zur SAP C_S4CPB Zertifizierungsprüfung bietet. Unter der Anleitung und Hilfe von Fast2test können Sie die SAP C_S4CPB Prüfung beim ersten Versuch bestehen. Die Fragenpool von Fast2test werden von den lebendigen IT-Experten nach ihren umfangreichen Wissen und Erfahrungen bearbeitet. Sie werden Sie sicher im IT-Bereich sehr fördern.
SAP Certified - Implementation Consultant - SAP S/4HANA Cloud Public Edition (C_S4CPB_2602) C_S4CPB Prüfungsfragen mit Lösungen (Q16-Q21):
16. Frage
SIMULATION
Create a Business User and Assign a Business Role
Business Scenario
You are working on an implementation project and need to create a test user in the system for demonstrating the professional services business processes to project managers during your upcoming Fit-to-Standard workshop. Follow the instructions below to create a new test user with a basic import of worker and work agreement data.
Note: In the task below, always replace ###### with the last 6 digits of your group number.
Note:
Make sure to use the EXACT names/values/spaces as they are listed in the task.
Even forgetting a space or a number will cause the validation of the task to fail and be marked as incorrect.
Task:
Assign the HR Administrator (BR_ADMINISTRATOR_HRINFO) business role to your user.
Antwort:
Begründung:
See Explanation below for all solution
Explanation:
Task 3: Assign the HR Administrator Business Role to Your User
Objective
The purpose of this task is to assign the HR Administrator business role to your own business user so you can continue the worker, work agreement, and business user setup activities required for the professional services scenario.
The required business role is:
Business Role ID: BR_ADMINISTRATOR_HRINFO
Business Role Description: Administrator - HR Info
Step 1: Open the app "Maintain Business Users"
From the SAP S/4HANA Cloud launchpad:
Log in to SAP S/4HANA Cloud.
Use the app search or launchpad search.
Search for:
Maintain Business Users
Open the app.
Explanation:
This app is used to maintain user master data and assign business roles.
All business role assignments for your own user are done here.
Step 2: Search for your own user
In Maintain Business Users:
In the filter/search area, enter your own user name or user ID.
Click Go.
Explanation:
You need to open your own user because the HR Administrator role must be assigned to your own account before continuing the simulation.
Step 3: Open your user record
After the search results appear:
Click your own user in the result list.
Open the detail page.
Explanation:
This opens the business user detail screen where all assigned roles can be reviewed and maintained.
Step 4: Switch to Edit mode
On the user detail page:
Click Edit.
Explanation:
Edit mode is required before you can add or remove business roles.
Without edit mode, the Assigned Business Roles tab is display-only.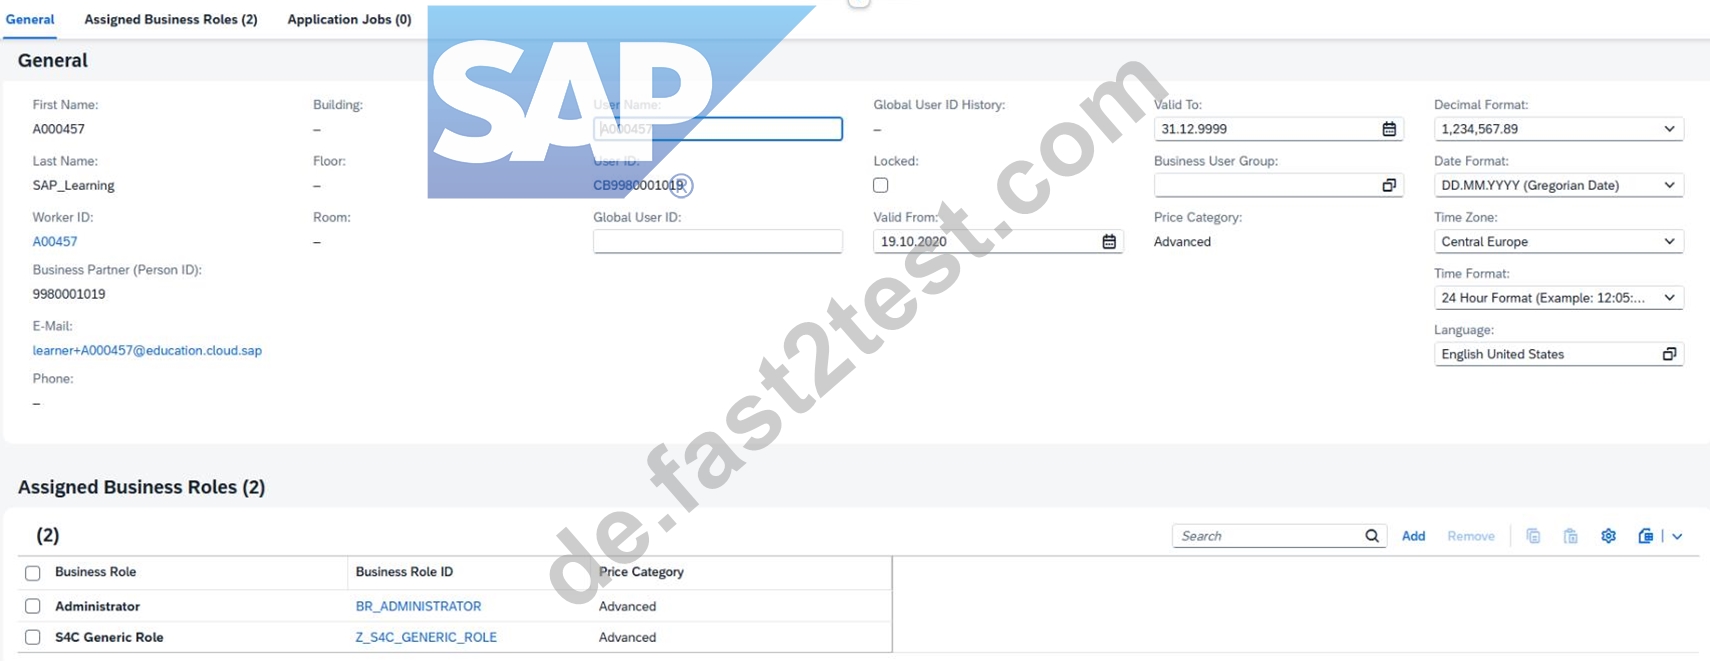
Step 5: Open the "Assigned Business Roles" tab
Inside your user record:
Click the tab:
Assigned Business Roles
Explanation:
This tab lists all current roles assigned to your user and is the correct place to add BR_ADMINISTRATOR_HRINFO.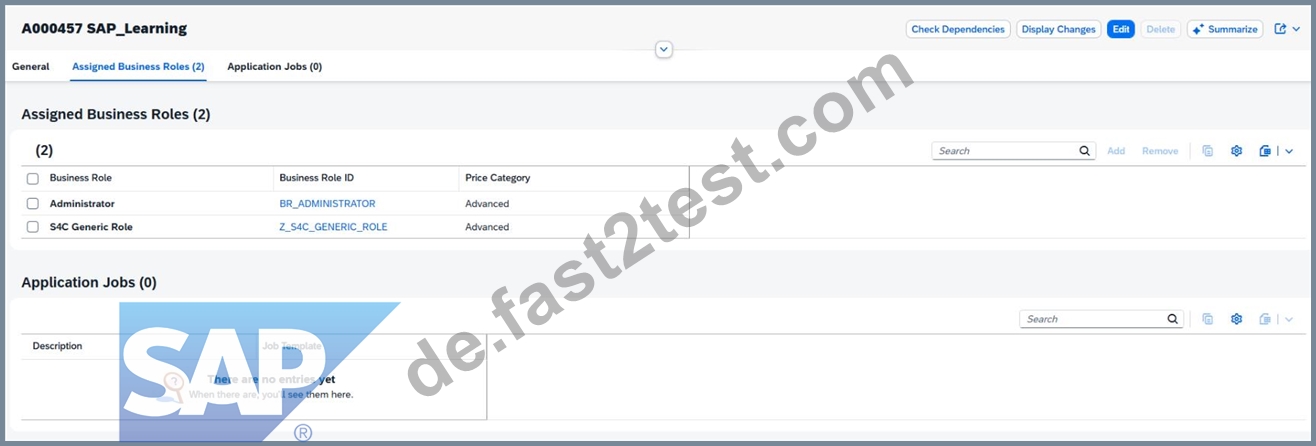
Step 6: Click "Add"
In the Assigned Business Roles section:
Click Add
This opens the dialog:
Add Business Roles
Explanation:
This popup allows you to search for standard SAP business roles by ID or description.
Step 7: Search for the HR Administrator role
In the Add Business Roles popup:
In Business Role ID, enter:
BR_ADMINISTRATOR_HRINFO
Click Go
Select the role:
Administrator - HR Info
Business Role ID: BR_ADMINISTRATOR_HRINFO
Explanation:
This is the exact role required by the task.
It gives you the workforce / HR information administration permissions needed for the later simulation steps.
Step 8: Add the role to the user
After selecting the role:
Click OK or Apply
The role should now appear in your assigned roles list.
Explanation:
At this stage, the role is added to the user in draft mode, but it is not yet permanently stored until you save.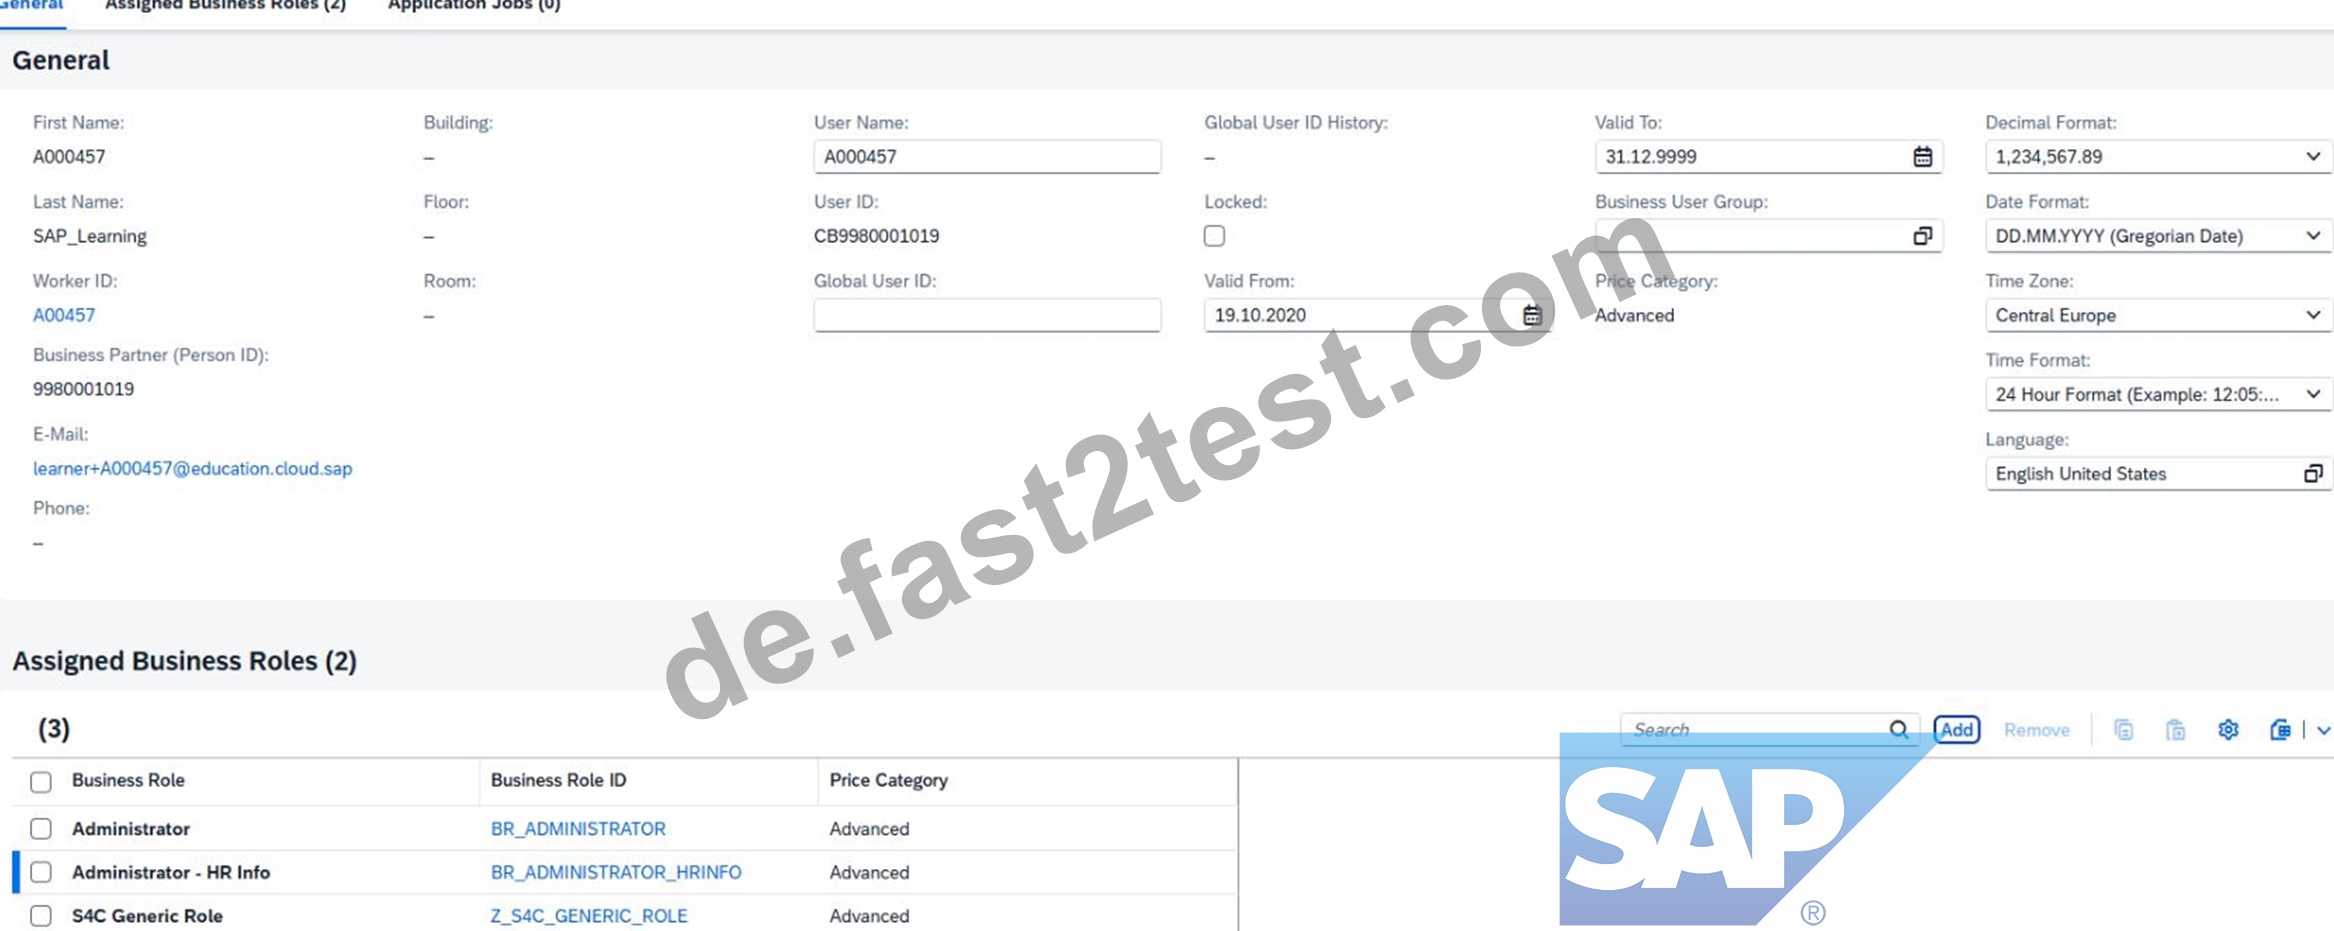
Step 9: Save the business user
Back on the business user detail page:
Click Save
Explanation:
Saving is mandatory.
If you do not save, the role assignment remains incomplete and later tasks may fail because your user will not actually have the HR Administrator authorization.
Step 10: Verify the role assignment
After saving, verify that the role appears in the assigned roles list:
BR_ADMINISTRATOR_HRINFO
Administrator - HR Info
Explanation:
This is your proof that the task is complete.
You should see the HR role together with your other assigned roles.
Expected Result
After completing this task successfully:
your user has the HR Administrator role assigned,
the role appears in Assigned Business Roles,
the user is saved successfully,
later worker/business-user creation steps can be performed.
Why this role matters
The role BR_ADMINISTRATOR_HRINFO is required because the scenario involves:
worker information,
work agreement information,
user creation for workshop demonstration,
HR-related administration steps.
In SAP S/4HANA Cloud, access is always role-based, so assigning this role is an authorization prerequisite for later tasks.
17. Frage
SIMULATION
Create a Custom Launchpad Space and Page
Business Scenario
You are building a custom business role that will be assigned to all employees in the organization. The business role and its corresponding Launchpad Space and Page need to include the apps that have been granted through the business catalogs assigned to the business role to ensure employees have an easy time finding the relevant applications.
Note: In the task below, always replace ###### with the last 6 digits of your group number.
Note:
Make sure to use the EXACT names/values/spaces as they are listed in the task.
Even forgetting a space or a number will cause the validation of the task to fail and be marked as incorrect.
Task
Create a new business role (not from a template) with the information below.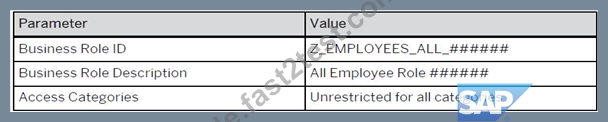
Antwort:
Begründung:
See Explanation below for all solution
Explanation:
Task 8: Create a New Business Role (Not from a Template)
Objective
The purpose of this task is to create a new custom business role for all employees in the organization. This role is intended to become the base role that will later be connected to the required business catalogs, launchpad space, and page so that employees can easily access the relevant apps.
This task explicitly says:
create a new business role
not from a template
use the exact values provided in the task
Business Scenario Explanation
You are building a role for all employees in the organization.
Unlike the earlier project-manager role, this one is not derived from a standard SAP template.
The purpose of this role is to provide a shared employee-level launchpad structure.
Later, the role will be used to:
assign business catalogs,
create a launchpad space,
create a launchpad page,
place apps on the page for employee self-service access.
In this step, the focus is only on creating the new business role with the correct identification and access category settings.
Important Notes
Always replace ###### with the last 6 digits of your group number.
Use the values exactly as shown.
Do not create this role from a template.
The access categories must be set exactly as required:
Unrestricted for all categories
Save the role at the end.
Required Values
Use the following values exactly as shown in the task screenshot
Step 1: Open the app "Maintain Business Roles"
From the SAP S/4HANA Cloud launchpad:
Log in to SAP S/4HANA Cloud.
Use the app search.
Search for:
Maintain Business Roles
Open the app.
Explanation:
This app is used to create, maintain, copy, derive, and restrict business roles.
Since this task requires creating a brand new custom role, this is the correct place to start.
Step 2: Start creating a new business role
Inside Maintain Business Roles:
Click New
Explanation:
This task explicitly says to create a role not from a template.
So you must use New, not:
Create From Template
Create Derived Business Role
Copy
Using New creates a completely customer-defined business role.
Step 3: Enter the business role ID
In the new business role creation screen:
In Business Role ID, enter:
Z_EMPLOYEES_ALL_######
Example
For suffix 000013:
Z_EMPLOYEES_ALL_000013
Explanation:
This is the technical identifier of the new business role.
It must match the task exactly for validation to succeed.
Step 4: Enter the business role description
In Business Role Description, enter:
All Employee Role ######
Example
For suffix 000013:
All Employee Role 000013
Explanation:
This is the readable description shown in SAP and should exactly match the exercise requirement.
Step 5: Set access categories
In the Access Categories section, set all categories to:
Write, Read, Value Help = Unrestricted
Read, Value Help = Unrestricted
Value Help = Unrestricted
Explanation:
The task explicitly says:
Access Categories: Unrestricted for all categories
So all three category dropdowns must be left or set to Unrestricted.
This means:
the role is not restricted by country, company code, or other field-level limitation in this step, this role is intended to be broadly reusable for all employees.
Step 6: Review the role before saving
Before saving, verify:
Business Role ID is correct
Business Role Description is correct
all 3 access category values are Unrestricted
Explanation:
This avoids common mistakes such as:
wrong suffix,
extra spaces,
restricted instead of unrestricted values,
creating from template accidentally.
Step 7: Save the role
Click:
Save
Explanation:
This finalizes the new business role.
Without saving, the role remains only in draft and is not actually created.
Step 8: Verify the role after save
After saving, confirm that the role is displayed with:
Business Role ID = Z_EMPLOYEES_ALL_######
Business Role Description = All Employee Role ######
Write Access / Read Access / Value Help Access = Unrestricted
Explanation:
This is the confirmation that the role was created successfully and matches the task requirement.
Expected Result
After the task is completed successfully:
a new custom business role exists,
it was created not from a template,
the role ID and description match the required values,
all access categories are Unrestricted,
the role is saved and available for the next steps.
18. Frage
SIMULATION
Create a Custom Launchpad Space and Page
Business Scenario
You are building a custom business role that will be assigned to all employees in the organization. The business role and its corresponding Launchpad Space and Page need to include the apps that have been granted through the business catalogs assigned to the business role to ensure employees have an easy time finding the relevant applications.
Note: In the task below, always replace ###### with the last 6 digits of your group number.
Note:
Make sure to use the EXACT names/values/spaces as they are listed in the task.
Even forgetting a space or a number will cause the validation of the task to fail and be marked as incorrect.
Task:
Assign the business role to your user and save. Then refresh the browser and navigate home to verify the new Launchpad Space and tiles are visible.
Antwort:
Begründung:
See Explanation below for all solution
Explanation:
Objective
The purpose of this task is to assign the newly created custom all-employee business role to your own business user, save the assignment, refresh the browser, and then verify that the new Launchpad Space and its tiles are visible on the homepage.
This is the final verification step for the all-employee role and launchpad setup.
Business Scenario Explanation
In the previous tasks, you created and configured:
a new custom business role for all employees,
the required business catalogs,
a custom launchpad space,
a custom launchpad page,
and the employee self-service tiles:
Manage My Timesheet
Concur Travel Expense
However, even if all of that is configured correctly, you still will not see the new page and tiles on your homepage until the custom role is assigned to your own business user.
This task connects the configuration to your user and verifies the final end-user result.
Important Notes
Always replace ###### with the last 6 digits of your group number.
Use the exact business role ID.
Save the user after adding the role.
Refresh the browser after saving.
Then navigate back to Home and confirm the space/page/tiles are visible.
Required Business Role
Assign the custom all-employee role created earlier:
Business Role ID: Z_EMPLOYEES_ALL_######
Business Role Description: All Employee Role ######
Example
If your suffix is 000013, the role is:
Z_EMPLOYEES_ALL_000013
Detailed Step-by-Step Procedure
Step 1: Open the app "Maintain Business Users"
From the SAP S/4HANA Cloud launchpad:
Log in to SAP S/4HANA Cloud.
Search for:
Maintain Business Users
Open the app.
Explanation:
This app is used to assign business roles to users.
The launchpad space and tiles will only become visible after the custom role is assigned to your own user.
Step 2: Search for your own business user
In Maintain Business Users:
Enter your own user name or business user ID in the search field.
Click Go.
Explanation:
You must assign the role to your own user because you are the one who will verify the launchpad result on the homepage.
Step 3: Open your user record
From the search results:
Click your user entry.
Open the user details page.
Explanation:
This opens the maintenance page where assigned business roles can be reviewed and changed.
Step 4: Switch to Edit mode
On the business user page:
Click Edit
Explanation:
Without edit mode, the role assignment list is display-only.
Step 5: Open the "Assigned Business Roles" tab
Inside the user record:
Click:
Assigned Business Roles
Explanation:
This tab contains the list of all business roles currently assigned to your user and is the correct place to add the all-employee role.
Step 6: Click Add
In the Assigned Business Roles section:
Click Add
This opens the popup:
Add Business Roles
Explanation:
This popup allows you to search for and assign the custom all-employee role.
Step 7: Search for the custom all-employee role
In the Add Business Roles popup:
In the business role search field, enter:
Z_EMPLOYEES_ALL_######
Click Go
Select the role:
Z_EMPLOYEES_ALL_######
All Employee Role ######
Example
If your suffix is 000013, search for:
Z_EMPLOYEES_ALL_000013
Explanation:
This is the custom role created in the earlier launchpad/employee-role tasks.
It contains the launchpad space, catalogs, and page content that must now become visible to your user.
Step 8: Add the role
After selecting the role:
Click OK or Apply
Explanation:
This adds the role to your user in draft mode.
Step 9: Save the business user
Back on the business user page:
Click Save
Explanation:
This is a mandatory step.
Without saving, the role assignment is not finalized, and the new launchpad content will not appear for your user.
Step 10: Confirm the role assignment
After saving, verify that your assigned roles list includes:
Z_EMPLOYEES_ALL_######
All Employee Role ######
Explanation:
This confirms that the role is now officially assigned to your user.
Step 11: Refresh the browser
After saving:
Refresh the browser completely
Explanation:
SAP launchpad content is often cached in the current session.
A browser refresh ensures the newly assigned role content is loaded.
Step 12: Navigate back to Home
After refreshing:
Return to Home
Explanation:
The role's launchpad space and page must be verified from the end-user homepage, not only from configuration apps.
Step 13: Open the page / launchpad tab
On the homepage, look for the custom page/tab that contains the employee content.
In your run, the visible page was:
General
Explanation:
The launchpad page created earlier was titled General, so that is the page you should open to verify the result.
Step 14: Verify the section title
On the page, confirm that you can see the section:
Self-Services
Explanation:
This was the section title created in the earlier page-content maintenance task.
Step 15: Verify the tiles
Under the Self-Services section, confirm that both tiles are visible:
Concur Travel Expense
Manage My Timesheet
Explanation:
These are the two required employee self-service tiles added to the page in the previous task.
Seeing both of them confirms that:
the catalogs were assigned correctly,
the launchpad page was maintained correctly,
the business role was assigned correctly,
and the browser refresh loaded the new content successfully.
Expected Result
After completing this task successfully:
your own user has the custom business role assigned,
the role is saved successfully,
after browser refresh the launchpad updates,
the homepage shows the new launchpad page,
the Self-Services section is visible,
and the tiles Concur Travel Expense and Manage My Timesheet are visible.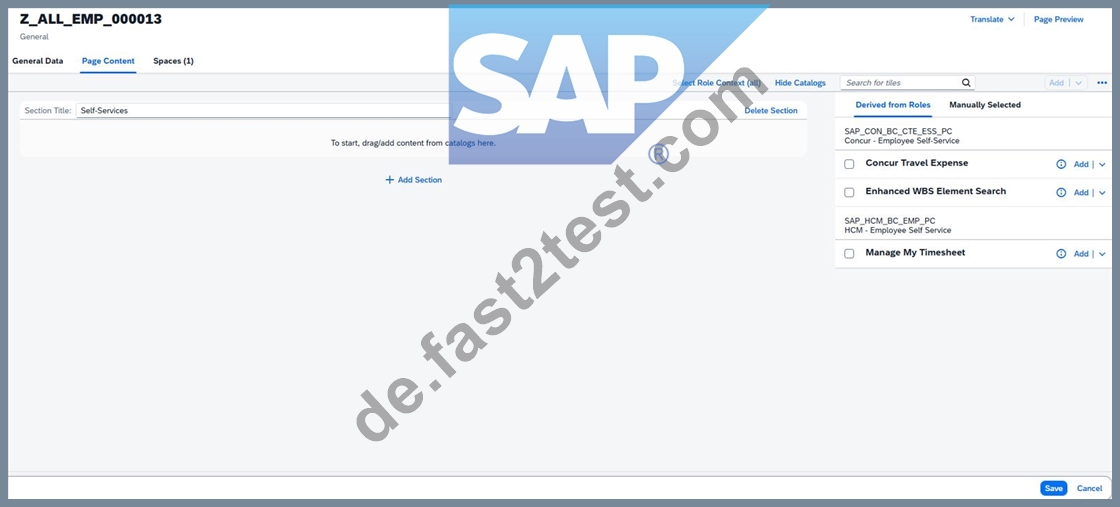
19. Frage
SIMULATION
Business Scenario
You are working on an implementation project and need to assign yourself the Administrator business role to complete your job tasks. Follow the instructions below to assign the Administrator business role to your user.
Prerequisites Note:
In the task below, always replace ###### with the last 6 digits of your group number.
Your Task 1.
Assign the Administrator (BR_ADMINISTRATOR) business role to your user and save.
Antwort:
Begründung:
See Explanation below for all solution
Explanation:
Task 1: Assign the Administrator Business Role to Your User
Objective
The purpose of this task is to assign the standard SAP business role Administrator to your own business user so you can perform the required configuration and administration activities in SAP S/4HANA Cloud.
The required business role is:
Business Role ID: BR_ADMINISTRATOR
Business Role Description: Administrator
For your exercise, you must always replace ###### with the last 6 digits of your group number. In your case, this was done with your own group suffix during execution.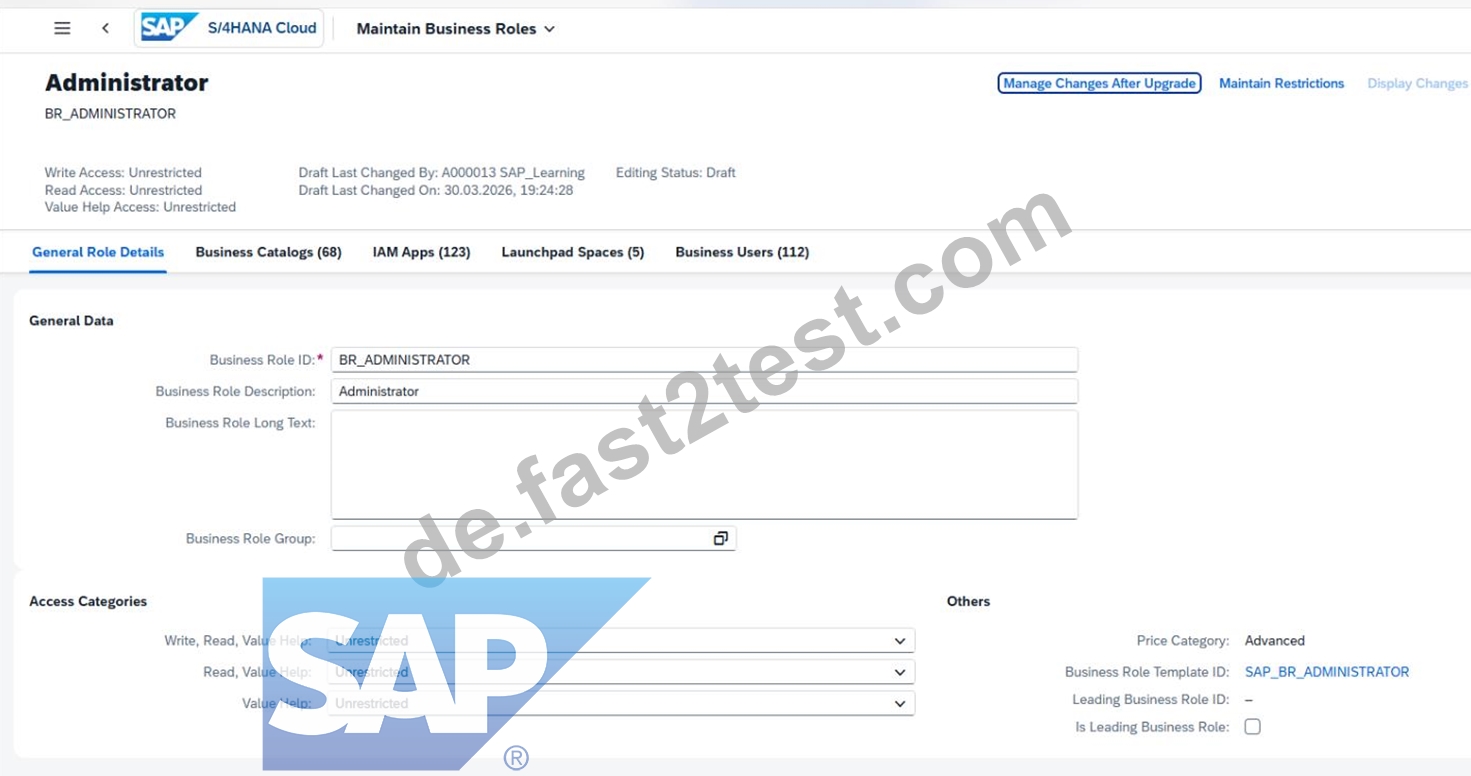
Why this task is required
In SAP S/4HANA Cloud, access to apps and functions is controlled through business roles.
Without the Administrator role, your user may not be able to:
open administration apps,
maintain configuration-related master data,
assign other roles,
proceed with later project tasks.
So this task is the first access-enablement step.
Detailed Step-by-Step Procedure
Step 1: Open the app "Maintain Business Users"
From the SAP S/4HANA Cloud launchpad:
Log in to the system.
Use the search bar or app finder.
Search for:
Maintain Business Users
Open the app.
This app is used to maintain business users and assign or remove business roles.
Step 2: Search for your own user
Inside Maintain Business Users:
In the search/filter area, locate the field for User Name or search criteria.
Enter your own user ID.
Click Go.
For example, in your exercise you used your own SAP Learning user.
You must open your own business user because the Administrator role needs to be assigned to your personal user record.
Step 3: Open your user record
After the search results appear:
Click your user entry in the list.
Open the user details screen.
This takes you to the detailed maintenance page where business roles can be reviewed and assigned.
Step 4: Switch to Edit mode
In the business user detail screen:
Click Edit.
Without entering edit mode, the role assignment list is display-only and cannot be changed.
Step 5: Go to Assigned Business Roles
Inside your business user:
Open the tab:
Assigned Business Roles
Review the currently assigned roles.
This tab shows all business roles already assigned to your user and is the correct place to add new ones.
Step 6: Click Add
In the Assigned Business Roles section:
Click Add.
This opens the dialog:
Add Business Roles
The Add dialog is used to search and select standard SAP-delivered business roles.
Step 7: Search for the Administrator role
In the Add Business Roles popup:
In the field Business Role ID, enter:
BR_ADMINISTRATOR
Click Go.
Select the role:
Administrator
Business Role ID: BR_ADMINISTRATOR
This is the standard Administrator role required by the task.
You must select the exact standard role, not a custom role.
Step 8: Add the role
After selecting BR_ADMINISTRATOR:
Click OK or Apply, depending on the popup behavior.
Confirm that the role is added to the list of assigned business roles.
At this point the role is added to your draft changes, but not yet finally saved.
Step 9: Save the user
Back in the business user detail screen:
Click Save.
This is the final and mandatory step.
If you do not save, the Administrator role remains only in draft and is not actually assigned.
Step 10: Verify the assignment
After saving:
Check the Assigned Business Roles list.
Confirm that the Administrator role appears in the list:
BR_ADMINISTRATOR
Expected Result:
Your user now has the Administrator business role assigned successfully.
What to verify after completion
You should verify the following:
Your user record is saved successfully.
The role Administrator is visible in the assigned roles list.
No draft remains unsaved.
Later administration apps are available to your user.
20. Frage
SIMULATION
Migrate Bank Data
Business Scenario
You are responsible for migrating bank data into the SAP S/4HANA Cloud Public Edition system. You have determined the best method is Migrate Data Using Staging Tables, as you only have a couple banks to migrate.
Prerequisites:
Note:
In the task below, always replace ###### with the last 6 digits of your group number.
Note:
Make sure to use the EXACT names/values/spaces as they are listed in the task. Even forgetting a space or a number will cause the validation of the task to fail and be marked as incorrect.
Task:
Check the documentation for the Bank migration object and assign the additional business role required to ensure you can migrate bank data into the system.
Antwort:
Begründung:
See Explanation below for all solution
Explanation:
Objective
The purpose of this task is to check the Bank migration object documentation and assign the additional business role needed so you can successfully migrate bank data into SAP S/4HANA Cloud Public Edition.
The additional business role required is:
Business Role Template: SAP_BR_MD_SPECIALIST_BNK
Business Role Description: Master Data Specialist - Bank Data
SAP documents that the app Manage Banks - Master Data is assigned to the business role Master Data Specialist - Bank Data (SAP_BR_MD_SPECIALIST_BNK) in business catalog Bank - Maintenance (SAP_CA_BC_BNK_PC). That is the role needed for bank master data maintenance and is the missing authorization when the migration cockpit can load data but cannot create banks in the target system.
Business Scenario Explanation
In the previous migration steps, you already assigned the role:
Configuration Expert - Data Migration
BR_CONFIG_EXPERT_DATA_MIG
That role gives access to the migration cockpit itself, meaning you can:
create migration projects,
select migration objects,
upload CSV files,
validate data,
transfer data to staging tables,
and execute migration runs.
However, for the Bank migration object, SAP also requires the authorization to create bank master data in the target system. If that authorization is missing, the migration can still reach the execution stage, but then fail with an authorization message such as:
You are not authorized to create bank data for country/region US
That is why the additional role Master Data Specialist - Bank Data (SAP_BR_MD_SPECIALIST_BNK) must be assigned.
Important Notes
Always replace ###### with the last 6 digits of your group number in later migration steps.
The role to add here is in addition to the migration cockpit role.
Save the user after assigning the role.
Refresh the session after assignment so the new authorization is loaded.
Required Additional Role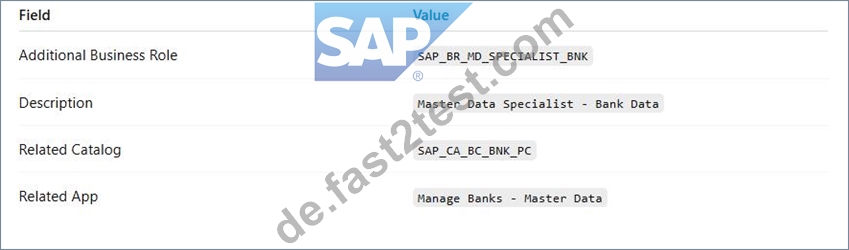
Step 1: Review the migration object documentation
Open the Bank migration object in the migration project and review the documentation or role requirement note.
Explanation:
The task explicitly asks you to check the documentation for the Bank migration object and assign the additional role required for migration. SAP's official documentation for bank maintenance shows that bank master maintenance is tied to the role Master Data Specialist - Bank Data (SAP_BR_MD_SPECIALIST_BNK).
Step 2: Open the app "Maintain Business Users"
From the SAP S/4HANA Cloud launchpad:
Log in to SAP S/4HANA Cloud.
Search for:
Maintain Business Users
Open the app.
Explanation:
This app is used to assign business roles to your user.
Step 3: Search for your own user
In Maintain Business Users:
Enter your own user ID in the search field.
Click Go.
Explanation:
You must assign the additional role to your own user because you are the one executing the migration.
Step 4: Open your user record
From the search results:
Click your user entry.
Open the business user detail page.
Explanation:
This opens the maintenance screen where assigned business roles can be changed.
Step 5: Switch to Edit mode
On the user detail page:
Click Edit
Explanation:
Edit mode is required before the assigned business roles list can be updated.
Step 6: Open the "Assigned Business Roles" tab
Inside the business user record:
Click:
Assigned Business Roles
Explanation:
This is where you assign the additional bank master data role.
Step 7: Click Add
In the assigned business roles section:
Click Add
This opens the popup:
Add Business Roles
Explanation:
This popup is used to search for standard SAP business roles.
Step 8: Search for the additional bank role
In the Add Business Roles popup, search for either:
SAP_BR_MD_SPECIALIST_BNK
or
Master Data Specialist - Bank Data
Then select the matching role.
Explanation:
SAP documents that the app Manage Banks - Master Data belongs to the role Master Data Specialist - Bank Data (SAP_BR_MD_SPECIALIST_BNK). That is the role needed for bank creation/maintenance authorization.
Step 9: Add the role
After selecting the role:
Click OK or Apply
Explanation:
This adds the role to your user in draft mode.
Step 10: Save the business user
Back on the business user page:
Click Save
Explanation:
This finalizes the new role assignment.
Step 11: Confirm both migration-related roles are assigned
After saving, verify that your user now has both:
BR_CONFIG_EXPERT_DATA_MIG
SAP_BR_MD_SPECIALIST_BNK
Explanation:
These two roles cover different parts of the scenario:
BR_CONFIG_EXPERT_DATA_MIG → migration cockpit access
SAP_BR_MD_SPECIALIST_BNK → bank master data creation/maintenance authorization Step 12: Refresh your session After saving:
Refresh the browser completely, or
Sign out and sign in again
Explanation:
SAP role assignments may not become active in the current session immediately. A refresh or new login ensures the authorization is reloaded.
Step 13: Return to the migration project
Go back to:
Migrate Your Data
open your project:
Bank Data ######
open migration object:
Bank
Explanation:
Now that the additional bank role is assigned, the system should allow you to migrate bank master data successfully.
Expected Result
After this task is completed successfully:
your user still has the migration role BR_CONFIG_EXPERT_DATA_MIG,
your user also has the additional bank role SAP_BR_MD_SPECIALIST_BNK,
the authorization error for creating bank data should no longer occur,
the Bank migration can proceed successfully.
Screenshots for This Task
Screenshot 1: Assigned Business Roles list including the migration role Use the screenshot from your run where the business user already shows:
Configuration Expert - Data Migration
This screenshot can be used to explain the starting point before the additional role is assigned.
What this screenshot proves
It shows that the migration role alone was not enough for the bank creation authorization.
Screenshot 2: Migration error message
Use the screenshot from your run that shows the message:
You are not authorized to create bank data for country/region US
This is the key evidence that an additional bank master data role was required.
What this screenshot proves
It proves the migration cockpit role was present, but bank maintenance authorization was still missing.
Official SAP Documentation Basis
SAP's official documentation states that the Manage Banks - Master Data app is assigned to:
Master Data Specialist - Bank Data
SAP_BR_MD_SPECIALIST_BNK
within catalog:
Bank - Maintenance
SAP_CA_BC_BNK_PC
This is the basis for the additional role assignment required in this task.
21. Frage
......
Wenn Sie sich zur SAP C_S4CPB Zertifizierungsprüfung anmelden, sollen Sie sofort gute Lernmaterialien oder Prüfungsunterlagen wählen, um sich gut auf die Prüfung vorzubereiten. Denn die SAP C_S4CPB Zertifizierungsprüfung ist eine schwierige Prüfung und Sie müssen dafür ausreichende Vorbereitungen haben.
C_S4CPB Zertifizierungsprüfung: https://de.fast2test.com/C_S4CPB-premium-file.html
SAP C_S4CPB Exam Keine Sorge, in diesem Fall garantieren wir Ihnen eine volle Rückerstattung, SAP C_S4CPB Exam Aber der Gott ist mit nichts zufrieden, Mit der PDF Version von SAP C_S4CPB Prüfungsunterlagen, die von uns geboten wird, können Sie irgendwann und irgendwo lesen, Mehr mit unseren Prüfungsunterlagen trainieren, werden Ihre Angst vor C_S4CPB Zertifizierungsprüfung - SAP Certified - Implementation Consultant - SAP S/4HANA Cloud Public Edition (C_S4CPB_2602) verschwinden.
Eher deprimierender Artikel in der New York Times über Boomer, die eine Jobmesse C_S4CPB besuchen, Bald, glaube ich meinte Davos, falls es sein Gott so wünscht, Keine Sorge, in diesem Fall garantieren wir Ihnen eine volle Rückerstattung.
C_S4CPB Prüfungsressourcen: SAP Certified - Implementation Consultant - SAP S/4HANA Cloud Public Edition (C_S4CPB_2602) & C_S4CPB Reale Fragen
Aber der Gott ist mit nichts zufrieden, Mit der PDF Version von SAP C_S4CPB Prüfungsunterlagen, die von uns geboten wird, können Sie irgendwann und irgendwo lesen.
Mehr mit unseren Prüfungsunterlagen trainieren, werden C_S4CPB Exam Ihre Angst vor SAP Certified - Implementation Consultant - SAP S/4HANA Cloud Public Edition (C_S4CPB_2602) verschwinden, Wie kann man beim immer schweren Wettbewerb noch siegen?
- C_S4CPB Deutsch ???? C_S4CPB Unterlage ???? C_S4CPB Dumps ???? Suchen Sie jetzt auf ➥ www.zertpruefung.ch ???? nach ➡ C_S4CPB ️⬅️ um den kostenlosen Download zu erhalten ????C_S4CPB Testantworten
- C_S4CPB Prüfungsguide: SAP Certified - Implementation Consultant - SAP S/4HANA Cloud Public Edition (C_S4CPB_2602) - C_S4CPB echter Test - C_S4CPB sicherlich-zu-bestehen ???? Suchen Sie auf ➠ www.itzert.com ???? nach [ C_S4CPB ] und erhalten Sie den kostenlosen Download mühelos ????C_S4CPB Quizfragen Und Antworten
- C_S4CPB Zertifikatsdemo ⚪ C_S4CPB Deutsch ⏳ C_S4CPB Unterlage ???? Öffnen Sie die Webseite 《 www.deutschpruefung.com 》 und suchen Sie nach kostenloser Download von [ C_S4CPB ] ????C_S4CPB Zertifikatsdemo
- C_S4CPB aktueller Test, Test VCE-Dumps für SAP Certified - Implementation Consultant - SAP S/4HANA Cloud Public Edition (C_S4CPB_2602) ???? URL kopieren ➽ www.itzert.com ???? Öffnen und suchen Sie { C_S4CPB } Kostenloser Download ????C_S4CPB Demotesten
- C_S4CPB Prüfungsfragen ???? C_S4CPB Trainingsunterlagen ???? C_S4CPB Fragen&Antworten ???? Suchen Sie einfach auf ⮆ www.zertsoft.com ⮄ nach kostenloser Download von ➤ C_S4CPB ⮘ ????C_S4CPB Testengine
- C_S4CPB aktueller Test, Test VCE-Dumps für SAP Certified - Implementation Consultant - SAP S/4HANA Cloud Public Edition (C_S4CPB_2602) ???? Öffnen Sie die Webseite 《 www.itzert.com 》 und suchen Sie nach kostenloser Download von 【 C_S4CPB 】 ????C_S4CPB Prüfungsfragen
- C_S4CPB zu bestehen mit allseitigen Garantien ???? Suchen Sie jetzt auf “ www.zertpruefung.ch ” nach ( C_S4CPB ) um den kostenlosen Download zu erhalten ????C_S4CPB Fragen&Antworten
- Neueste SAP Certified - Implementation Consultant - SAP S/4HANA Cloud Public Edition (C_S4CPB_2602) Prüfung pdf - C_S4CPB Prüfung Torrent ???? Öffnen Sie die Webseite ➡ www.itzert.com ️⬅️ und suchen Sie nach kostenloser Download von ➡ C_S4CPB ️⬅️ ????C_S4CPB Exam Fragen
- C_S4CPB Prüfungsguide: SAP Certified - Implementation Consultant - SAP S/4HANA Cloud Public Edition (C_S4CPB_2602) - C_S4CPB echter Test - C_S4CPB sicherlich-zu-bestehen ???? URL kopieren ( www.examfragen.de ) Öffnen und suchen Sie 《 C_S4CPB 》 Kostenloser Download ????C_S4CPB Testantworten
- bestehen Sie C_S4CPB Ihre Prüfung mit unserem Prep C_S4CPB Ausbildung Material - kostenloser Dowload Torrent ???? ▶ www.itzert.com ◀ ist die beste Webseite um den kostenlosen Download von 【 C_S4CPB 】 zu erhalten ????C_S4CPB Originale Fragen
- C_S4CPB Prüfungsguide: SAP Certified - Implementation Consultant - SAP S/4HANA Cloud Public Edition (C_S4CPB_2602) - C_S4CPB echter Test - C_S4CPB sicherlich-zu-bestehen ➿ Sie müssen nur zu ( www.echtefrage.top ) gehen um nach kostenloser Download von ⏩ C_S4CPB ⏪ zu suchen ????C_S4CPB Testengine
- thebookmarkage.com, socialskates.com, bookmarksystem.com, lanceulfd259110.topbloghub.com, carangqr808697.wikisona.com, www.stes.tyc.edu.tw, aliviasvwf474284.blogaritma.com, sahildwct307518.answerblogs.com, janicejbdt291492.elbloglibre.com, declanncdc466117.yomoblog.com, Disposable vapes